Centos7下LNMP基础环境搭建 2045次阅读 Centos • 学习归纳 2022-07-18 本次实验使用本人闲置的华为云服务器(无广!华为打钱) ## 一、 准备基础环境  SSH连接到需要配置的服务器 ### 服务设置 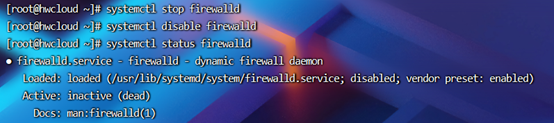 关闭防火墙并查看确认防火墙状态为dead(死亡)  临时关闭selinux  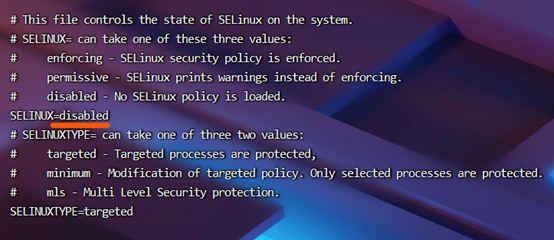 修改/etc/selinux/config的selinux项为disabled实现永久关闭selinux。保存并退出  Get一下selinux状态,确保为disabled ### 基础软件包安装 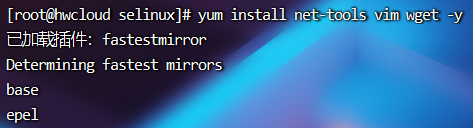 安装: net-tools 用于ifconfig命令获取网络状态 Vim 用于编辑配置文件等 Wget 用于下载repo源 ### 修改yum源为国内源(按需修改) wget -P /etc/yum.repo.d/CentOS-Base.repo http://mirrors.aliyun.com/repo/Centos-7.repo 下载阿里云yum源并替换本地文件 Yum clean all 清除内存里的旧yum源 Yum makecache 创建新yum源缓存 ## 二、安装Nginx [如何手动在ECS实例上搭建LNMP环境(CentOS 7)_云服务器 ECS-阿里云](https://help.aliyun.com/document_detail/97251.html#section-0ho-omf-0ct) 安装其他版本nginx参考,本文使用默认的1.20.1版本 ### 创建nginx的repo(按需创建) 如果yum install nginx可以直接安装则忽略此步骤  cd /etc/yum.repo.d 进入repo的根目录  创建一个nginx.repo文件,并编辑它 ``` [nginx-stable] name=nginx stable repo baseurl=http://nginx.org/packages/centos/$releasever/$basearch/ gpgcheck=1 enabled=1 gpgkey=https://nginx.org/keys/nginx_signing.key module_hotfixes=true [nginx-mainline] name=nginx mainline repo baseurl=http://nginx.org/packages/mainline/centos/$releasever/$basearch/ gpgcheck=1 enabled=0 gpgkey=https://nginx.org/keys/nginx_signing.key module_hotfixes=true ``` 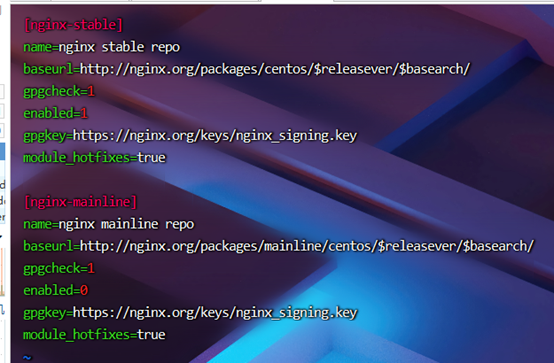 将如上文件内容复制黏贴到nginx.repo内,保存退出 Yum clean all 清除内存里的旧yum源 Yum makecache 创建新yum源缓存 ### 继续安装nginx 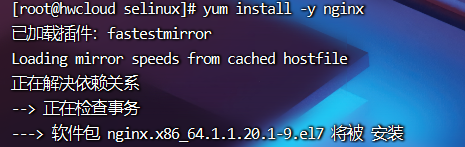 安装nginx  查看nginx版本,正常返回结果即nginx已安装完毕  启动nginx进行测试  在浏览器输入服务器的公网IP,测试网页能正常打开。  暂时先把服务器关闭,待后续修改配置文件后再启动 ## 三、安装MySQL ### 下载上传mysql安装包 Ps:由于国内特殊环境,在线安装mysql极其繁琐,获取资源时间长,故本次使用离线安装。 [MySQL :: Download MySQL Community Server](https://dev.mysql.com/downloads/mysql/) 打开mysql下载页面 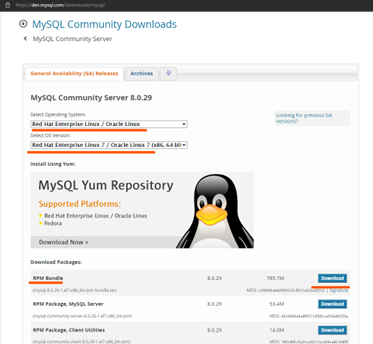 按实际条件选择。我的操作系统是centos7,所以选择redhat 7 /x86,选择第一项下载完整包 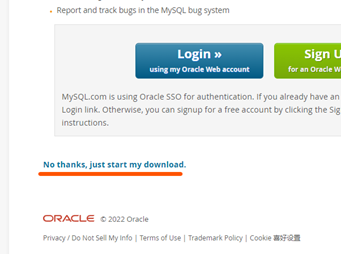 此处提示登陆,我们直接跳过登陆,开始下载  下载速度缓慢,我用已有的5.7版本演示,安装步骤大同小异  将该文件上传至服务器任意目录下 ### 安装mysql  创建mysql目录,将安装包复制一份到mysql目录内 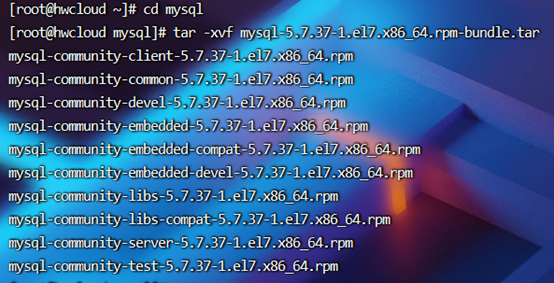  解压安装包到当前目录 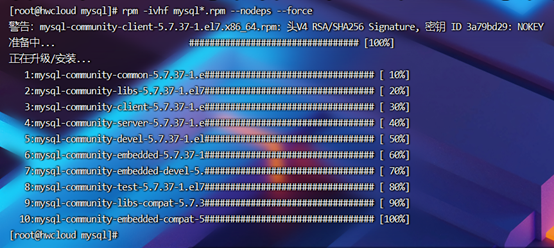 安装mysql,设置参数跳过认证秘钥等,否则会报错 ### mysql设置  启动mysql服务  查询mysql日志内,自动生成的默认密码,我这里为+GdeYgQ*w2B7 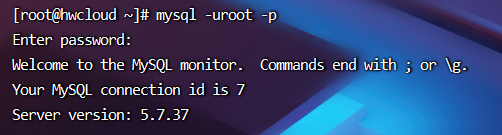 输入mysql -uroot -p命令登陆root账户,回车后提示输入密码。将上面的密码黏贴进去。  设置MySQL的密码策略为LOW(只验证长度)(!谨慎)  设置MySQL密码最低长度为6位(!谨慎)  修改root账户的密码为123456(请将123456替换为合适的密码) 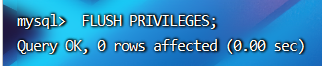 刷新MySQL权限  退出mysql ## 四、 安装PHP 参考文章:[CENTOS 7 YUM 安装PHP7.4_高高的风的博客-CSDN博客_yum安装php7.4](https://blog.csdn.net/qq_35845964/article/details/110246464) 安装前请注意php的版本,本次使用php7.4 ### 安装yum源 yum install epel-release  yum install http://rpms.remirepo.net/enterprise/remi-release-7.rpm -y  安装yum源 ### 安装yum管理工具 yum install yum-utils  安装yum管理工具 rpm -ivh http://rpms.famillecollet.com/enterprise/remi-release-7.rpm 看需安装remi源 ### 安装php7.4 yum install php74-php-gd php74-php-pdo php74-php-mbstring php74-php-cli php74-php-fpm php74-php-mysqlnd  systemctl enable php74-php-fpm && systemctl start php74-php-fpm  设置php-fpm服务开机自启和启动服务 ### 配置nginx支持php组件 #### 修改配置文件  首先进入到/etc/nginx目录下  显示一下主配置文件的内容 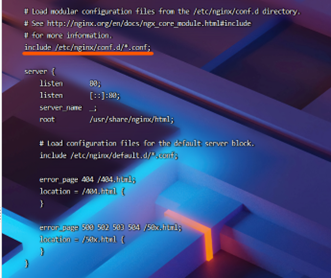 我们看到它是include了/etc/nginx/conf.d目录下的所有.conf格式的文件,并在下面给出了模板格式,将模板文件复制一份  进入到conf.d目录下  创建一个任意名字,以.conf结尾的文件 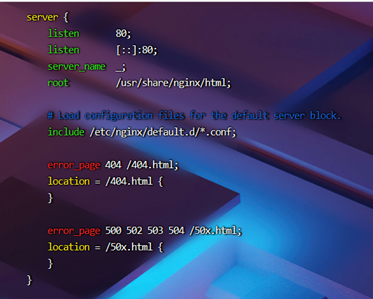 将我们的模板文件内容黏贴进来 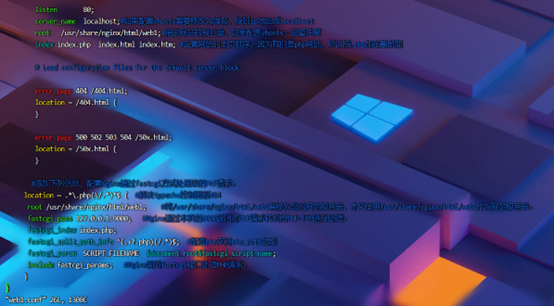 ``` server{ listen 80; server_name localhost;#如果配置vhosts需要修改为域名,反则ip地址或localhost root /usr/share/nginx/html/web1;#指定网站的根目录,如果配置vhosts一定要注意 index index.php index.html index.htm; #设置网站的主页顺序,因为我们是php网站,所以把.php加在最前面 error_page 404 /404.html; location = /404.html { } error_page 500 502 503 504 /50x.html; location = /50x.html { } #添加下列信息,配置Nginx通过fastcgi方式处理您的PHP请求。 location ~ .*\.php(\/.*)*$ { #解决typecho控制面板404 root /usr/share/nginx/html/web1; #将/usr/share/nginx/html/web1替换为您的网站根目录,本文使用/usr/share/nginx/html/web1作为网站根目录。 fastcgi_pass 127.0.0.1:9000; #Nginx通过本机的9000端口将PHP请求转发给PHP-FPM进行处理。 fastcgi_index index.php; fastcgi_split_path_info ^(.+?.php)(/.*)$; #配置php支持php_path功能 fastcgi_param SCRIPT_FILENAME $document_root$fastcgi_script_name; include fastcgi_params; #Nginx调用fastcgi接口处理PHP请求。 } } ``` 将配置文件修改为我们的形状!例子已放在上头,根据实际情况修改!  使用nginx -t 命令对配置文件格式进行检查,提示successful即为成功  设置nginx开机自启动并重启nginx使配置文件生效 ##### 创建测试网页  由于我们在上面配置文件过程中使用的网站根目录为/usr/share/nginx/html/web1  所以在创建测试网页前,我们要创建该根目录  创建后进入该目录下  创建测试网页文件 内容如上 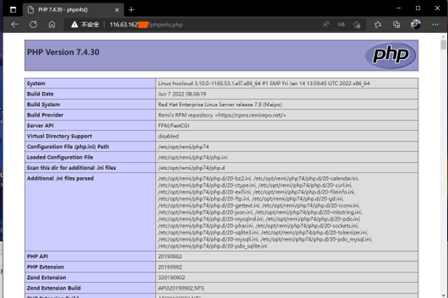 在浏览器输入公网IP/phpinfo.php,能打开如上界面即为开启php支持成功 Ps:测试后请立即删除该网页文件,以免泄露服务器信息 最后一次更新于2022-11-15 LNMP 网页服务器


0 条评论